
Crafting packets and test profiles is becoming much easier with tools such as scapy and Trex, the following tutorial will walk through a test case for creating ‘EtherIP’ or RFC 3378 type packets and a test stream
Using Scapy
Scapy is a well known packet creating, manipulation and testing tool written in python. Details can be found within the Github repo: https://github.com/secdev/scapy
You can use Scapy in interactive mode to create and define packets, however we have an easy method which will:
- Create a new custom packet / packet header (EtherIP - tunneling ethernet frames in IP) Commonly used for Wifi tunnels
- Generate a .pcap file from this packet
- Add this to a profile and generate a defined packet-per-second rate
- Create streams within the profile
- Simulate a test stream within Trex using ‘stl-sim’ and confirm our packets and profile are ready to be used for testing
A recent requirement to test some firewall infrastructure under load when processing fragmented EtherIP traffic from Wifi tunnels spawned this test.
Trex stateless profiles and setup
This type of test will work in stateless mode only, as we are just sending UDP datagrams between each interface and through a DUT (device-under-test)
For more information on setting up Trex traffic generator for stateless mode, please refer to the documentation page Stateless support
For the purpose of packet creating, profiles, API interaction and simulation the standard build and default setup are fine.
The traffic generator comes with a ‘stl-sim’ function which operates as a python script and calls an executable and can be found in the default directory for the app:
user@trex:~/v2.14$ ls
automation       doc_process.py       find_python.sh        scapy_daemon_server  t-rex-64-debug-gdb        trex-console
avl              dpdk_nic_bind.py     ko                    stl                  _t-rex-64-debug-o         trex_daemon_server
bp-sim-64        dpdk_nic_bind.pyc    libzmq.so.3           stl-sim              t-rex-64-debug-o
bp-sim-64-debug  dpdk_setup_ports.py  master_daemon.py      _t-rex-64            _t-rex-64-o
cap2             dumy_libs            python-lib            t-rex-64             t-rex-64-o
cfg              exp                  run_functional_tests  _t-rex-64-debug      trex-cfg
daemon_server    external_libs        run_regression        t-rex-64-debug       trex_client_v2.14.tar.gz
Creating the packet
As we are creating a packet header which does not exist yet in Scapy we need to import the scapy modules along with the trex_stl_lib.api
from trex_stl_lib.api import *
from scapy.fields import BitField
from scapy.packet import Packet, bind_layers
from scapy.layers.inet import IP
from scapy.layers.l2 import Ether
Create a class and add the relevant EtherIP fields. The relevant modules from scapy used are ‘bind_layers’, ‘BitField’, ‘IP’ and ‘Ether’
We just bind the layers (headers) together and register the relevant protocol type and fragment offset.
class EtherIP(Packet):
    name = "EtherIP / RFC 3378"
    fields_desc = [ BitField("version", 3, 4),
                    BitField("reserved", 0, 12)]

bind_layers( IP,            EtherIP,       frag=0, proto=0x61)
bind_layers( EtherIP,       Ether)
Once the scapy definitions are done we create the trex ‘stl’ class to use and take the headers we just created above and add the relevant layer 4 header / port numbers, in this case UDP = 16666. Note the order of header creation for the packets, Ethernet > IP > EtherIP > IP > UDP
class STLS1(object):

    def __init__ (self):
        pass;

    def create_stream (self):
        pkt =  Ether()/IP()/EtherIP()/Ether()/IP()/UDP(sport=16666,dport=16666)
        #pkt.show2()
        #hexdump(pkt)

        # create a burst of 17 packets
        return STLStream(packet = STLPktBuilder(pkt = pkt ,vm = []),
                        mode = STLTXSingleBurst( pps = 100, total_pkts = 17) )


    def get_streams (self, direction = 0, **kwargs):
        # create 1 stream
        return [ self.create_stream() ]

def register():
    return STLS1()
Testing and converting to a pcap file
The following runs the traffic profile through the TRex simulator, limiting the number of packets to 10, and storing the output in a pcap file. This must be run from the location which contains ‘stl-sim’ or refer to this location when running.
user@trex:~/v2.14$ sudo ./stl-sim -f stl/ether_ip.py -o ether_ip_pkt.pcap -l 10

executing command: '/home/user/v2.14/bp-sim-64-debug --pcap --sl --cores 1 --limit 10 -f /tmp/tmpEfHVXs -o ether_ip_pkt.pcap'

General info:
------------

image type:               debug
I/O output:               ether_ip_pkt.pcap
packet limit:             10
core recording:           merge all

Configuration info:
-------------------

ports:                    2
cores:                    1

Port Config:
------------

stream count:             1
max PPS    :              1.00  pps
max BPS L1 :              816.00  bps
max BPS L2 :              656.00  bps
line util. :              0.00  %


Starting simulation...


Simulation summary:
-------------------

core index 0
-----------------

    simulated packets  : 10
    non active packets : 0
    on-wire packets    : 10

Total:
-----------------

    simulated packets  : 10
    non active packets : 0
    on-wire packets    : 10

written 10 packets to 'ether_ip_pkt.pcap'
Our pcap file will be written to the current directory:
user@trex:~/v2.14$ ls -l
total 207088
drwxr-xr-x  6 user user     4096 Jan 10 12:14 automation
drwxr-xr-x  2 user user     4096 Jan 10 12:14 avl
-rwxr-xr-x  1 user user 33413037 Jan 10 12:14 bp-sim-64
-rwxr-xr-x  1 user user 19916626 Jan 10 12:14 bp-sim-64-debug
drwxr-xr-x  2 user user     4096 Jan 10 12:14 cap2
drwxr-xr-x  2 user user     4096 Jan 10 12:14 cfg
-rwxr-xr-x  1 user user     5481 Jan 10 12:14 daemon_server
-rwxr-xr-x  1 user user     2207 Jan 10 12:14 doc_process.py
-rwxr-xr-x  1 user user    27996 Jan 10 12:14 dpdk_nic_bind.py
-rw-r--r--  1 root root    21540 Jan 30 16:16 dpdk_nic_bind.pyc
-rwxr-xr-x  1 user user    46648 Jan 10 12:14 dpdk_setup_ports.py
drwxr-xr-x  2 user user     4096 Jan 10 12:14 dumy_libs
*-rw-r--r--  1 root root      964 Feb  2 14:58 ether_ip_pkt.pcap*
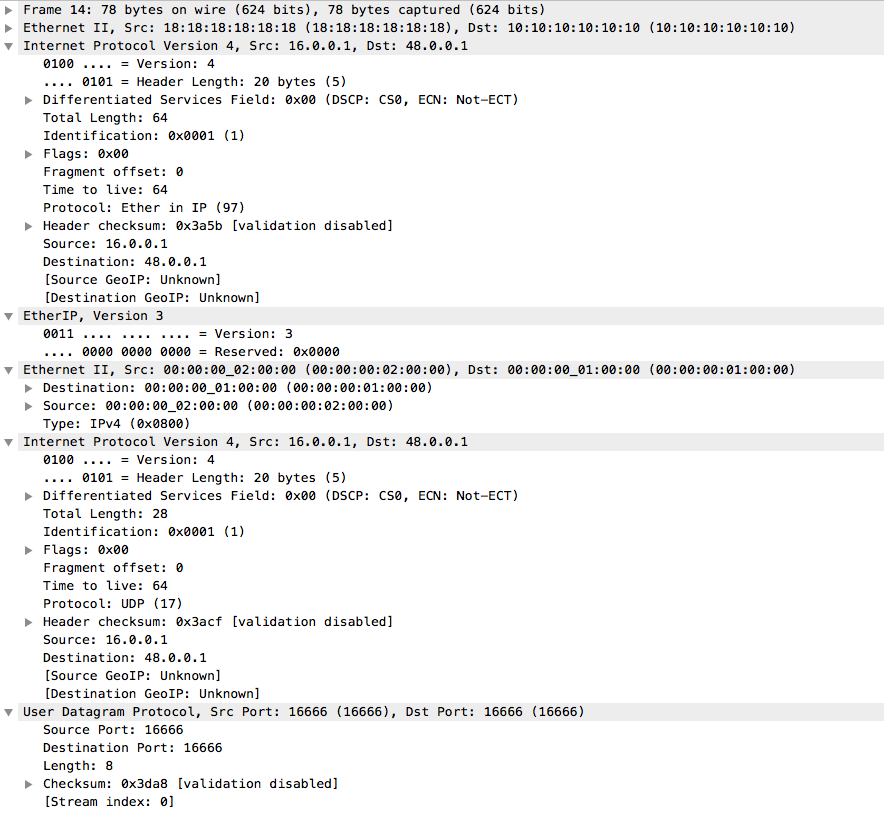
The end result should be a standard .pcap file and look like the below output

Looking at the detail of each packet, we can see the relevant and correct Ethernet headers and versions. Two ethernet headers, two IP headers, etc…
This profile and packet can now be used to create a test stream either via API or directly on the traffic generator. We will post this in a new entry and detail the steps…